This Chapter is likely to be updated regularly since I'm still learning about terrain painting. But I know enough to get you started. Just like in Terrain sculpting, you learn by doing. So let's proceed.
1. First I loaded up this tiny river map for this lesson

2. Next I added a few trees, lots, paths and sculpted the bottom-left island for a little beach


1. First I loaded up this tiny river map for this lesson
2. Next I added a few trees, lots, paths and sculpted the bottom-left island for a little beach
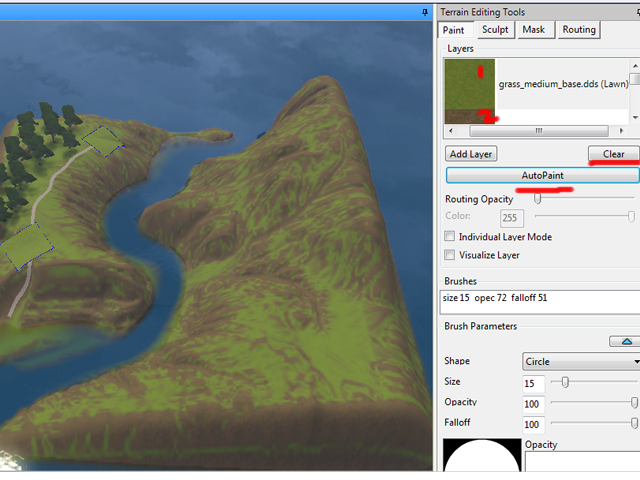
3. Click on the Terrain tab and select terrain tools. This time of course we are working with the Paint section. This is very similar to the Sculpt section. You have different layers of terrain textures and brush sizes.
4. I want to briefly point out that you can adjust the size of the panel at various points by dragging. Just roll your mouse over the panel, and the movable points will show up as black dotted lines, which I have indicated below.
5. The painting panel starts off with the 4 default textures. The first one is the texture of your whole map.
6. You may Add new texture layers to the original 4 above by clicking add layer and selecting the texture you want, give a sound and name.
7. You may also Edit an existing texture layer by right-clicking it and selecting edit. If you edit the first default layer, "grass_medium_base.dds", it will change the texture of your whole world. As you can see in fig. B. and C. below I changed the texture to dirt and concrete.
A close look at fig C and you will see that the lots did not change texture. This means that after painting your world you will have to delete and replace all your lots, if you want them to be the same color. (fig D)
EASY TIP: Delete the Lot, then click the undo button. The lot will be replaced and the terrain paint will be fixed.. easy.
I prefer to have my world completely laid out before painting, that means roads, lots, trees, and decorations. Why? it helps me know what texture I need. Besides, terrain painting is a continuous process.
8. Below is an example of AutoPaint. It basically uses the first 2 textures. I generally do not advice its use. Or you can use it to give you start and just edit the areas you do not like. The Clear button is to remove the auto paint.
9. I cut out a section of the EA help book for CAW. Please download it if you haven't already. It is very helpful. As you see it explains the other stuff like individual layer mode and visualize layer. Both of which are things I have never had use for. But you might find them useful depending on what your doing.

10. Moving on. I decided to start with the river banks. It's an easy enough place to start from. I added the layer dirt_light to my textures. Remember you have to click the layer to use it. Below I used it with the brush on the default settings (circled in red) and as you can see it is too dark and harsh.
11. In Fig A below I have adjusted the brush settings to something more subtle. Be sure to save the settings you like by clicking the little button with the blue triangle.
Texture painting operates by layers. So it you paint over an already painted area, that is on top of a painted area, you will simply make it darker, so be careful about what you choose to paint over. (fig B)
12. So below I have covered the rivers, it's taking shape I think
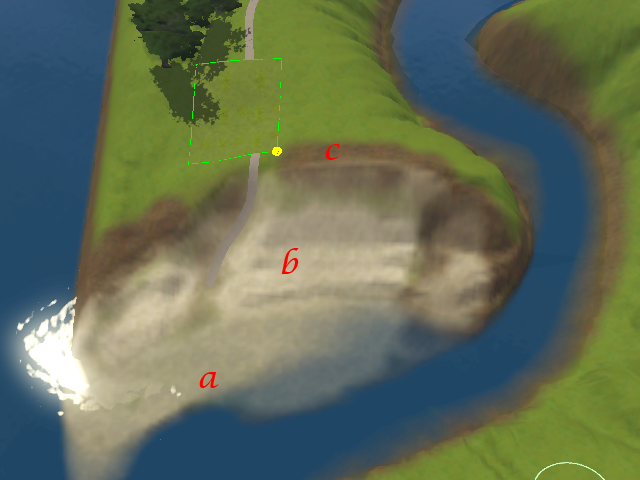
13. Next I tackled the beach. Layer A. is dark sand, layer B is light sand, and Layer C is light dirt. I do light layers over one another till I achieve the blend that I want. You don't want your edges to be sharp, a slight blur creates a realistic blending. This is where the Falloff on your brush settings becomes important. Opacity affects transparency of your texture, that is, can you see through it.
14. Then it's the little details, the grooves and valleys and hills. Highlight them with some texture. Below I used Light dirt in the grooves and then a layer of dark grass to make the area look wet and more grassy.

15. So here's my final effort. It's not perfect, but it's not suppose to be. Paint your whole world, then work on the details. Take it step by step and try not to over do it. You will be shocked what effect you can have with only 5 or 6 textures.

16. Finally, in my opinion, no matter how great your terrain painting looks from afar, try to always zoom in for a "sim's eye" view of the landscape, because during game-play that's the stuff you will notice.

So that's it for now on terrain painting. next, lights, trees, flowers and rocks. Thanks for reading.
15. So here's my final effort. It's not perfect, but it's not suppose to be. Paint your whole world, then work on the details. Take it step by step and try not to over do it. You will be shocked what effect you can have with only 5 or 6 textures.
16. Finally, in my opinion, no matter how great your terrain painting looks from afar, try to always zoom in for a "sim's eye" view of the landscape, because during game-play that's the stuff you will notice.
So that's it for now on terrain painting. next, lights, trees, flowers and rocks. Thanks for reading.
Can you post something on making custom textures for terrain paint? Everytime I try to use a custom texture it tiles but there are visible lines between segments.
ReplyDeletehi,
DeleteThe reason you have visible lines is because your texture is not seamless. This I already knew. What I didn't know is how to make a texture seamless.
Well after a lot of exploring, I came across this tutorial on youtube. I tested it out and I can tell you it's genius. Just click the link below.
http://www.youtube.com/watch?v=xbi6Xf4JQb4
the tutorial uses adobe photoshop, but I think the technique can be applied to any other photo editor.
So basically I'm stuck at terrain sculpting. Can you help me in terrain sculpting, if that's ok... no matter how many times I tried to sculpt, I can't create a proper hills or mountain even just a simple valleys like in sunset valley. I really need this help.. thanks!
ReplyDeleteHi Alexandria,
DeleteFirst of all I apologise for the very late reply, it was unavoidable. Now to help you out. Have you read this lesson yet?
http://krrank.blogspot.com/2011/12/tiptorial-terrain-sculpting.html
And if you have and are still having difficulties, what are the areas you need help in so that I may give advice?
No probs, I'm having trouble in creating smoother bigger hills, every time I made one, it will looks like small bulges on the upper side of the hills, even though I used the smooth tool. I want to make simple hills like the ones in monte vista or champ les sims.
Deleteand, could you tell me how to paint hills with the fading style, I'm having trouble with that too. Mine didn't seem to look real. Thanks!
Hi hi,
DeleteI've been really sick sorry. The only way I could help would be to make a new lesson. Frankly I have a few lessons due. But for now you could try a very large hill brush like size 80 and work the sections slowly.
Do you have to use individual layer mode? I heard some said its important
ReplyDeleteHi Kira, I personally have never used it, so I'll say you don't have to use it. I feel it complicates things as it creates new rules which I personally was not ready to remember.I can control my paint level manually just fine with out it.
Delete