These are the basics of terrain sculpting. I can only tell you what the tool does, but you have to actually use it to get a feel of it. I would advice that you open a blank world for practicing and just have a go at it.
1. Click Terrain tab on the Main menu, select terrain painting tools. A new panel will open on the right. Select Sculpt tab.

2. Click Mountains and click on the world. Try single clicks, one over the other, and try dragging. I feel single clicks have a better effect.

3. Click Hills and test. Steep hills are sharper and rougher. Gentle hills are softer and smoother.

4. Click Valleys and test. Steep valleys are deep and are good for digging out your rivers and lakes. Gentle valleys are shallow and are useful for making depressions, gutters and grooves.

5. The Flatten Terrain tool is very useful. Basically you can click a mountain, hill, or valley to level it out. It can be used as an eraser to wipe out errors too. Try it in different scenarios and watch the effect. The Gentle Flatten tool does the same thing but with a softer effect. It's nice for cliffs and mountains that you want to smoothen out but still retain some roughness.

6. The Smooth tool is another useful one. Great for calming your jagged edges and creating smooth sloping roads. It comes in two varieties, but the difference is quite subtle.

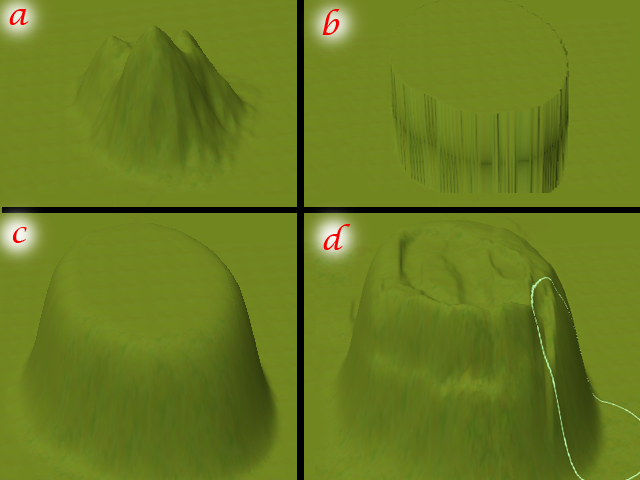
7. The Sheer Cliff tool is one I hardly use, but I found that it has to be used on a mountain or hill for the effect to show. Fig A is a mountain, Fig B is the mountain flattened out, Fig C I used the smooth tool to soften it, and Fig D is where I used the Sheer Cliff tool to give it texture.
8. Under the terrain editing tools panel, You can adjust the brush size and opacity.
Size - Bigger or smaller
Strength - How strong the effect of the tool is. In the pic below, 2 mountains where created with 3 clicks of the mouse each. The one on the left was at 100 strength and the one on the right was at 50 strength You can see the difference
Falloff - this affects how much of the tool will reach the edges of the brush. It means that the strength of the tool shall be stronger in the middle and weaker at the edges.

9. Test out the different effects of size, strength and falloff settings combined. You can save your favorites by clicking the little blue arrowhead.

That's all for terrain sculpting. This should help you get started with your masterpiece.
1. Click Terrain tab on the Main menu, select terrain painting tools. A new panel will open on the right. Select Sculpt tab.
2. Click Mountains and click on the world. Try single clicks, one over the other, and try dragging. I feel single clicks have a better effect.
3. Click Hills and test. Steep hills are sharper and rougher. Gentle hills are softer and smoother.
4. Click Valleys and test. Steep valleys are deep and are good for digging out your rivers and lakes. Gentle valleys are shallow and are useful for making depressions, gutters and grooves.
5. The Flatten Terrain tool is very useful. Basically you can click a mountain, hill, or valley to level it out. It can be used as an eraser to wipe out errors too. Try it in different scenarios and watch the effect. The Gentle Flatten tool does the same thing but with a softer effect. It's nice for cliffs and mountains that you want to smoothen out but still retain some roughness.
6. The Smooth tool is another useful one. Great for calming your jagged edges and creating smooth sloping roads. It comes in two varieties, but the difference is quite subtle.
7. The Sheer Cliff tool is one I hardly use, but I found that it has to be used on a mountain or hill for the effect to show. Fig A is a mountain, Fig B is the mountain flattened out, Fig C I used the smooth tool to soften it, and Fig D is where I used the Sheer Cliff tool to give it texture.
8. Under the terrain editing tools panel, You can adjust the brush size and opacity.
Size - Bigger or smaller
Strength - How strong the effect of the tool is. In the pic below, 2 mountains where created with 3 clicks of the mouse each. The one on the left was at 100 strength and the one on the right was at 50 strength You can see the difference
Falloff - this affects how much of the tool will reach the edges of the brush. It means that the strength of the tool shall be stronger in the middle and weaker at the edges.
9. Test out the different effects of size, strength and falloff settings combined. You can save your favorites by clicking the little blue arrowhead.
That's all for terrain sculpting. This should help you get started with your masterpiece.
I use the cliff tool, with a very small size, strength high, to paint ridges in my mountains. I use it as a hill and mountain texturing tool.
ReplyDeleteI don't like terrain painting, either. I also layer to get an effect.
Your tutorials have helped me a bunch! Thank you.
Great idea! Susan. I just tried out the cliff tool and had a very interesting effect. I see a new section on tools coming up and it's all thanks to you. I should write something on terrain painting soon too. I have been procrastinating because I need the lesson to be useful. So I'm still thinking it through. Thanks so much for reading and for your input.
DeleteTry this... make a smallish steep hill, slice the cliff tool over it in the same direction like harsh lines over it.
ReplyDeleteThen hit the hill with flatten terrain tool. It makes something really odd. You know those octagon rock formations in Ireland? Something oddly like that. I'll have to screenshot my formations and send to you. I don't know that I'll keep them but they sure looked interesting.
I had to look up those rock formations. Very interesting. Funny enough I just saw them in a movie I was watching last night. Odd coincidence. It seems the little used cliff tool could stand more exploration. It has rather interesting effects depending on the brush parameters used.
DeleteIf anyone out there is wondering, as I was, I believe Susan and krrank are talking about the Giant's Causeway, a collection of octagonal basalt columns in Northern Ireland: http://www.travelsinireland.com/northern/causeway.htm
ReplyDeleteHi ManKitten, thanks again and it was nice of you to provide a picture for everyone to see.
DeleteFirst, Thanks for all your guide for CAW !! Really helps alot !!
ReplyDeleteI'm wondering if i can make the terrain level as same as the road ? And how to do it ??
My road is uphill and i want to make the terrain Around that road as same as the road level...
And one more question, that uphill road is curving up and down, how to make it clean straight but still an uphill one ??.
Sorry for my english LOL
Thanks before :D
Hi, thanks for using my guide! Well the solution is to sculpt or shape your terrain the way you want, BEFORE you add your roads. the road will take the shape of the terrain and will be the same level too. you may email me a pic if you want.
DeleteAs for the Uphill issue. Shape the terrain uphill by creating short steps like a staircase, then use the smooth tool to make a smooth slope. Then you can draw your road, it will also be smooth.
DeleteHi Again, I have another question. How do you make the edge of your world to not look like there's an empty space under it or just drops off?
ReplyDeleteWish I'd found this page when I started creating a world over a year ago.
Thanks again.
Hello again, Once more apologies for the extremely late reply. The solution would be to soften the edges into the water's edge like a beach. Or create Mountains. Or use a Distant Terrain. But most importantly set your Camera's routing properly so that the in-game camera does not reach the end of your world. See tutorial here. http://krrank.blogspot.com/2012/04/chapter-six-routing.html
Delete