Through experience and some trial and error I have come up with this, hopefully easy, method of building your world and avoiding disaster. It isn't the only way to do it, but I can assure you that it is painless and quick. so here goes.
1. If you don't know anything about placing roads. Read this tutorial first
2. First we need LAYERS. I don't know the technicalities of having layers, but I do know they are useful for grouping your world into categories, which helps with management and game speed. A lot of objects go into the world and with layers, you can keep them separated, so that damage to one group will not affect another and you can also delete a whole group of objects at once
3. A quick revision. I assume by now that you have started a new world, and have the decided where your sunset/sunrise is and have also drawn up a preliminary rough sketch. All this saves time in future. Always remember to save your world regularly. You can rename your world at anytime before export, so don't worry.
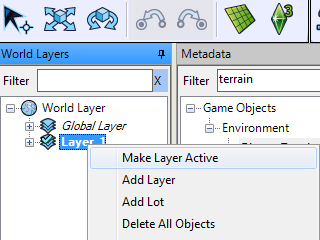
4. Right-click the WORLD LAYER link on the left-hand panel. Select ADD LAYER.

Repeat this about 7 times. Generally 7 layers should be sufficient. You can make more if you like. Click each layer once (a soft click, mind you) to rename it. Name your layers as LOTS, TREES, DECO, EFFECTS, SPAWNS, LIGHTS, BRIDGES.
Trouble in the past with bridges has taught me to give them their own group.

5. Next, Right-Click the Lots layer and select MAKE ACTIVE. Roads are not attached to layers (maybe the global layer) Anyway, the important thing is that you can place your roads even though you are in the Lots layer.
BUILDING ON FLAT LAND
1. Turn on your grid. make sure the angle is facing the one you chose while planning your sunset/sunrise view. Or leave it at "0" if you like.
2. Select the Road tool and the road texture, If you are using a custom road.
3. Pick your starting point on the map. I'm starting roughly at the centre. Lay down your roads as you have planned.
4. When you come to any point where you wish to place a lot, Click the ADD Lots icon, and drag out your Lot. Make sure it is flush with the road edge. Lots do not need to always touch the road, it depends on the effect you are going for. Read this tiptorial on lots for more details.

5. As you can see, the idea is to place the roads and lots simultaneously. This way your lots fit properly and you can immediately appreciate your world size and design. It also makes it easy to correct errors.
6. You can also fit in your sidewalks/ pathways.
BUILDING ON HILLS/MOUNTAINS/VALLEYS
1.Layout the roads and lots that you wish to be on a Hill/Mountiain/Valley. Make sure you leave a little room around the lots for movement. They cannot be tightly packed as on a flat terrain.

2. I am going to show you how to make lots on a Hill/Mountain. The same methods will apply to valleys. Select Hill and carefully click the the lots and roads like so, gently forming a hill/Mountain until you reach the desired height. Don't worry about the rough, bumpy look.
See this tiptorial for more on terrain tools.

3. select the flatten terrain tool and click at the point of your desired height and drag, this creates the flat base you need. be mindful to set your cursor to the right strength and size.

4. Repeat Step 3, for all the lots you are putting on a hill. Feel free to vary the heights. Try to look at your hill from the ground view too, so that you know just how high it really is for your sims.

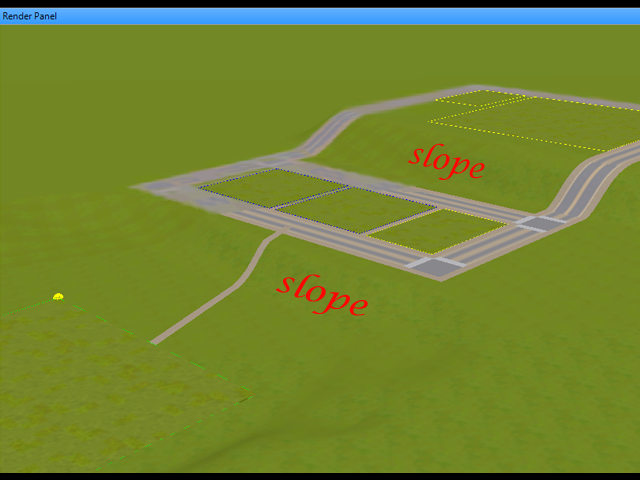
5. Hopefully by now you have something that looks like this image below

6.Use the select tool and select a lot, delete it, place it again. This is so that your lot now takes the shape of the terrain. Repeat for all affected lots.
A nice trick is to delete the lot, then click the undo button. It will replace the lot and retain any parameters you assigned the lot.


NOTE: do not get too attached to your lots. Depending on how many times you adjust the terrain, you might need to delete and replace regularly until the sculpting is done. (PLEASE PLEASE, DO NOT use flatten lot button. It has no control and can affect your carefully laid roads. It cannot be undone with the undo button either. It is safer to just delete the lot and replace.
7. select smooth tool (you can use the gentle version too) it all depends on how strong you want it. Start smoothing out the rough edges and the roads to create a nice even terrain.

8. So there you go!!! Houses on the hill. Just practice and it'll get easier

NOTE: ALWAYS END YOUR ROAD WITH AN INTERSECTION PIECE IF THAT END IS NOT ATTACHED TO ANOTHER ROAD. Otherwise you will have Routing Issues.
9. FAQ - Why don't I just scuplt the world BEFORE putting the roads and lots?
a) it takes longer to do in the long run
b) you'll spend a lot of time re-sculpting just to fit in the lots
c) you'll have a lot of uneven roads
Thanks for reading. Next Chapter, terrain painting. It needs it's own chapter, trust me.
To Anonymous. Your answer. you can even drag part of a lot into water. I will upload a live picture later.

1. If you don't know anything about placing roads. Read this tutorial first
2. First we need LAYERS. I don't know the technicalities of having layers, but I do know they are useful for grouping your world into categories, which helps with management and game speed. A lot of objects go into the world and with layers, you can keep them separated, so that damage to one group will not affect another and you can also delete a whole group of objects at once
3. A quick revision. I assume by now that you have started a new world, and have the decided where your sunset/sunrise is and have also drawn up a preliminary rough sketch. All this saves time in future. Always remember to save your world regularly. You can rename your world at anytime before export, so don't worry.
4. Right-click the WORLD LAYER link on the left-hand panel. Select ADD LAYER.
Repeat this about 7 times. Generally 7 layers should be sufficient. You can make more if you like. Click each layer once (a soft click, mind you) to rename it. Name your layers as LOTS, TREES, DECO, EFFECTS, SPAWNS, LIGHTS, BRIDGES.
Trouble in the past with bridges has taught me to give them their own group.
5. Next, Right-Click the Lots layer and select MAKE ACTIVE. Roads are not attached to layers (maybe the global layer) Anyway, the important thing is that you can place your roads even though you are in the Lots layer.
1. Turn on your grid. make sure the angle is facing the one you chose while planning your sunset/sunrise view. Or leave it at "0" if you like.
2. Select the Road tool and the road texture, If you are using a custom road.
3. Pick your starting point on the map. I'm starting roughly at the centre. Lay down your roads as you have planned.
4. When you come to any point where you wish to place a lot, Click the ADD Lots icon, and drag out your Lot. Make sure it is flush with the road edge. Lots do not need to always touch the road, it depends on the effect you are going for. Read this tiptorial on lots for more details.

5. As you can see, the idea is to place the roads and lots simultaneously. This way your lots fit properly and you can immediately appreciate your world size and design. It also makes it easy to correct errors.
6. You can also fit in your sidewalks/ pathways.
BUILDING ON HILLS/MOUNTAINS/VALLEYS
1.Layout the roads and lots that you wish to be on a Hill/Mountiain/Valley. Make sure you leave a little room around the lots for movement. They cannot be tightly packed as on a flat terrain.

2. I am going to show you how to make lots on a Hill/Mountain. The same methods will apply to valleys. Select Hill and carefully click the the lots and roads like so, gently forming a hill/Mountain until you reach the desired height. Don't worry about the rough, bumpy look.
See this tiptorial for more on terrain tools.

3. select the flatten terrain tool and click at the point of your desired height and drag, this creates the flat base you need. be mindful to set your cursor to the right strength and size.
4. Repeat Step 3, for all the lots you are putting on a hill. Feel free to vary the heights. Try to look at your hill from the ground view too, so that you know just how high it really is for your sims.

5. Hopefully by now you have something that looks like this image below

6.Use the select tool and select a lot, delete it, place it again. This is so that your lot now takes the shape of the terrain. Repeat for all affected lots.
A nice trick is to delete the lot, then click the undo button. It will replace the lot and retain any parameters you assigned the lot.


NOTE: do not get too attached to your lots. Depending on how many times you adjust the terrain, you might need to delete and replace regularly until the sculpting is done. (PLEASE PLEASE, DO NOT use flatten lot button. It has no control and can affect your carefully laid roads. It cannot be undone with the undo button either. It is safer to just delete the lot and replace.
7. select smooth tool (you can use the gentle version too) it all depends on how strong you want it. Start smoothing out the rough edges and the roads to create a nice even terrain.

8. So there you go!!! Houses on the hill. Just practice and it'll get easier
NOTE: ALWAYS END YOUR ROAD WITH AN INTERSECTION PIECE IF THAT END IS NOT ATTACHED TO ANOTHER ROAD. Otherwise you will have Routing Issues.
9. FAQ - Why don't I just scuplt the world BEFORE putting the roads and lots?
a) it takes longer to do in the long run
b) you'll spend a lot of time re-sculpting just to fit in the lots
c) you'll have a lot of uneven roads
Thanks for reading. Next Chapter, terrain painting. It needs it's own chapter, trust me.
To Anonymous. Your answer. you can even drag part of a lot into water. I will upload a live picture later.

Thank you for this tutorial, but I have a question.
ReplyDeleteWhat if I want to put a lot half on a level and half on the other?
Say in the last picture on the tutorial, where you wrote "slope" I would put a lot that connects to the top and bottom road, how do I do that without making it just raise a full square from the lower level?
And the same would apply if i want to position the lot over an inclined area, of course...how would you do it?
Hi.
DeleteWhat you do is just drag the lot down over the slope. It will take the shape of the slope. See the last picture above that i just added.
Thank you very much for the clarification, I already played a bit with that and it works very well, so good! :)
DeleteMy only regret is that lots cant be places one next the other but there ha to be a little bit of space in between, such a shame there's this limit or hasn't been found a cheat to overcome that. If it would be possible we could build very large palaces.
If there will be a The Sims 4, I hope they put away this limitation, or add simply a cheat to enable such thing, something like "SeamlessLinkingLot true/false", would be really nice! Oh well!
Of course they should also improve the CAW and make it more like the game in selecting and managing stuff, but that's a total other thing as well...
Anyway thank you for all the efforts you put in these tutorials, Thank you very much indeed!
You're welcome. Yeah it would be nice if you could do that. There is a trick I use though. Just place the lots one square apart and when decorating make use of pavement, trees, plants or terrain paint to cover the spaces. It will look seamless in-game. If you have Late Night EP, have a look at the city hall and the square in front of it. That's the same trick EA used. Or in Sunset Valley, the 3 apartments (Working Friends house) around the public pool are all separate lots but in-game they look like they are one.
DeleteRight, I checked and it is the way you said, looks convincing too.
DeleteI started playing with CAW a bit more and I already laid down several lots and streets and on my map looks all quite nice.
Now my question regarding lots positioning etc. is this one:
I am creating a "big" lot out of 3 lots of 64x64. Each of them is one behind the other.
The first one with part of the garden is right on the street.
The second one is in the middle, where the house will be placed.
The third one is on the back and that's where the end of the garden will be.
To give you a better idea, this is the house I will try to replicate: http://goo.gl/maps/3YXU
Now, how do I make the sim know that all the 3 lots are his?
Should I make the 2 outer lots like public park so he can travel through them?
I don't want other sims hanging out in there, so how could I give exclusive access only to a specific family if the neighbouring lots are public parks?
Another thing I was thinking is that to avoid people come from the sides I could just put some "sims non-routable" paint as big as one square, and maybe this will force the sims inside the house to use one or the other part of the garden to get out.
What do you think about that??
So , I have been giving this some thought. Making the gardens unroutable to other sims by using the sim-unroutable paint or a fence in CAW will work. the trick is to make the lands only accessible by going through the house in the middle. So if you are not an invited guest, you can't get in.
DeleteBut due to the mechanics of the game your sims can't actually 'know' the lands are his in the true sense. Ownership will be implied by the arrangement of the lots and players will get the point.
Also, in CAW, AFTER you have actually put the lots in place and decorated them, you can now change their designation to Community lots-->>Hidden tomb. This way there will be no map tags in-game and the lots will not attract visitors.
So I will turn the outer lots into hidden tomb so I avoid the visitors, but also having the only access on the front and on the back of the outer garden will grant to the owners of the house the sole access to it from the only entrances available.
DeleteI will experiment this with smaller lots and play them in game and see what is the effect, but I think it may just work good.
Thank you again for your suggestion and thank you for this very nice blog-tutorial.
Handy tip that lets you skip erasing and remaking lots after sculpting: switch to the move tool and press alt while giving the lot a little shake. It will conform to the new terrain configuration when you release the alt key. Only works with lots you haven't built on.
ReplyDeleteHi Anonymous,
DeleteThanks for the tip. I haven't been able to test it out myself because my CAW is temporarily bugged, but I definitely will. It is a nice alternative though.
Hello!
ReplyDeleteSo, I want to know: how can I change the sea color like Sunlit Tides sea?
It's a Mod or something like that?
Thank you and I really love this blog! It's helping me so much to create my world!
Hey hi,
DeleteI believe it involves changing and .ini file somewhere in the installation folder. So this is outside my area. But I believe there might be tutorials on sims wiki.
An easy trick would be to paint the terrain below the water the color you want, so that it shines through the ocean, like in Egypt (WA).
Hi, I know I'm a bit late, but could you include a list of lot sizes? I never know how big to make them.
ReplyDeleteHello,
Deletesorry for the very late reply. I have a list here.
http://krrank.blogspot.com/2011/12/chapter-two-planning-and-research.html.
Plus you can see a more detailed list here.
https://www.teoalida.com/thesims/worlds/
Hope this helps. Happy CAWing!
Hi, sorry for the inconvenience, I am following your caw guide, but I have a doubt about the levels;
ReplyDeletein the global layer marks all the objects in the world? that marks me things there that I do not understand what T_T are
And I write here x don't write in two different places, I tried to put the distant terrain of Egypt as the tutorial said but I can't put it, maybe I'm wrong to write the coordinates?
Hi, I don't understand the question. The global layer is the default layer and you need to create additional layer for the other objects in the world so that the game runs smoothly. Also, if the coordinates for the terrain do not work, you can move it manually with your mouse and keyboard.
Delete